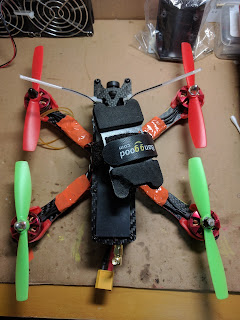
Martian-ii quadcopter build … by David HK March 2017
Martian-ii quadcopter build … by David HK March 2017
This is a replacement build using most of the components from my old
Nighthawk 280 Pro (which itself had been rebuilt once using all new components
apart from the frame), the NH 280 fell into a water way a few weeks ago,
destroyed my fpv cam and vtx. See below
URL link for more details.
http://davidhkblog1.blogspot.hk/2017/03/my-emax-nighthawk-280-pro-fell-into.html?m=1
Although the NH280 frame is still intact, but it is a bit big and
heavy, and since I want to run 4S, so I don’t really need a 6” frame as 4S + 6”
props = high-chance-of-smoke.
The components ported from the old quad are:
Motors: King Kong 2205 2300kv
ESC: Racerstar 30A lite (the BB1 version so can only run up to
Dshot300)
New components:
Frame: Martian-ii, I have been looking around for a 5” X frame, 1
criteria is I want the battery to mount on top instead of bottom, because I
think this will give it a more protection, so this eliminated most recent X
frames which mostly are designed with the battery mount at the bottom of the
frame. I saw many high rating for the
Alien frame, and Martian is a clone of the Alien frame, with Martian-ii an
upgrade version with 4mm arms, so Martian-ii it is. you can get this M-ii 220 frame from Banggood from below (there are 4" & 6" as well),
http://www.banggood.com/Martian-220-220mm-4mm-Arm-Thickness-Carbon-Fiber-Frame-Kit-w-PDB-For-FPV-Racing-p-1064065.html??p=3629013638443201601A
they also have spare 4mm arms:
http://www.banggood.com/Martian-180-220-250-4mm-Frame-Arm-Carbon-Fiber-180mm-220mm-250mm-p-1073092.html?p=3629013638443201601A
FC: ONMIBUS F4 Pro v2, I already built an X155 quad using this FC a month ago (see URL below),
http://davidhkblog1.blogspot.hk/2017/02/x155-quadcopter-build-with-omnibus-f4.html?m=1
so far I am happy with this F4 board, as it has betaflight OSD built-in,
current sensor, black box SD card, and most important of all, can support Frsky
D4R-ii inverted telemetry using softserial via resource mapping to PWM pin 5
(Betaflight v3.1.6 added feature for F4 board)
PDB: Since the stock PDB does not provide any BEC or scale down
regulator, and the F4 board can only provide either a 5V or VCC voltage out,
and I heard even the 5V out will cause some issue for the F4, so I decided to
use a PDB that have regulated 5V (for Cam, as the vtx does not have any v+ out)
and 12V (for vtx) out. Also I learned
that some PDB also has LC filter built in.
so in the end, I purchased the below PDB with exactly the required
features.
FPV cam: Foxeer HS1177 from Banggood:
Vtx: Eachine TS5828L 600mW 40CH vtx, I got it from banggood a few weeks
ago in their flash sales,
as I fly solo all the time, so 600mW is not an issue for me. It is stronger than the 200mw I used before, so I bought a 2nd one as a spare while the flash sales still there, but the LED version sold out already, so my 2nd one is the TS5852S, with the tiny little switches.
as I fly solo all the time, so 600mW is not an issue for me. It is stronger than the 200mw I used before, so I bought a 2nd one as a spare while the flash sales still there, but the LED version sold out already, so my 2nd one is the TS5852S, with the tiny little switches.
The whole build is quite straight forward, as this is my 3rd
build. The frame edge is quite sharp, so
I used 2000 scale metal sand paper and sand it with running water, only takes a
few minutes to smooth out all the edges.
Note that this metal sand paper are designed to work in wet condition,
and is widely used in car body repair shops.
The only difficulties in assemble the frame are:
1.
The 3 holes in each arm are very tight, with
zero tolerance, the trick to install them is not to tighten any screw until all
3 screws are inserted into the holes, if any 1 screw is tighten first, then you
may have created a slight misalignment of the other 1 or 2 holes.
2.
The 2 side holes for the HS1177 camera is just a
bit too small, so I need to use a small fryer to widen just a little bit of the
side holes, from the inside only. No
need to widen from the outside.
As mentioned above, I used a regulated PDB with LC filter built in, so
I did not install the stock PDB at all.
I don’t think the frame structure requires the stock PDB for its arm
enforcement.
The AUW is 404g without battery, compare this to my NH280's 550g, that's a saving of almost 150g!
Post-built notes:
Looks like the frame toughness is not as good as the NH280, as I was
practicing back flip, the quad dropped onto a concrete ground, may be it was
the arms that landed first, now there is a crack line in 1 of the arms, 2
motors’ shaft bended! Luckily the arms can be ordered separately, and I've replaced motor shafts a few times.


Comments
Post a Comment